Work in Progress
〰️
Work in Progress 〰️
The Ultimate Wii Hacking Guide (2026) | Written Tutorial
Thank you to all the homebrew developers that are keeping this console going. You can view the list of homebrew devs and their contributions HERE. Most of this is following the official https://wii.hacks.guide/
Section 00: Glossary
Click on the section to bring you to that particular part in the written guide.
Click the timestamp to bring you to that particular part in the video guide.
Section 0: Introduction 00:03
Section 00: Glossary 01:55
Section 01: Items Needed 02:10
Section 02: SD Card Setup 03:32
Section 03: Hacking the Wii 05:26
Section 3a: Wilbrand Method 05:57
Section 3b: Str2hax Method 09:40
Section 04: Hackmii & Bootmii Installer 11:33
Section 05: Backing Up Wii NAND 13:58
Section 06: Priiloader 17:40
Section 07: d2x cIOS Installation 19:43
Section 08: Wii is HACKED 23:31
Section 09: Libreshop Homebrew Store 24:09
Section 10: Shortcuts & Hacks Removal 25:01
Section 0: Introduction
The Wii is an incredible console once modded. It brings back features Nintendo shut down, like online multiplayer through Wiimmfi, Homebrew stores, emulators, game backups, and so much more. Modding, also called hacking, is way easier than on most other consoles. No soldering or hardware changes are needed, just an SD card and following clear steps. This PFG guide walks you through everything step by step, perfect for beginners. Most of the technical details here come straight from the official https://wii.hacks.guide/. A huge thank you goes to the homebrew developers that keep this console going.
Overview of the Hacking Process
Installing homebrew channel is our main goal in hacking the Wii. Once this is accomplished, you will have access to all homebrew apps and features. The entire process is a softmod, meaning it’s all done through software. No opening the console is required. bricking, or permanently breaking the system, is extremely rare as long as you follow the steps carefully. We’ll back up your NAND, a full copy of the internal memory, early on as a safety net. Ready? Let’s mod your Wii and bring it back to life in the new year!
Section 01: Items Needed
Before we start modding, gather these items. Having everything ready ahead of time makes the whole process go much smoother and helps avoid any annoying stops along the way.
1. Wii console
Your Wii needs to be completely stock, meaning unmodded with no previous hacks installed. Avoid the Wii family edition and Wii mini consoles.
2. SD card or MicroSD card inside an SD adapter
If you are buying a new SD card, go for 32GB or above. Smaller SD cards work fine too though.
3. Computer/PC
A PC with internet to download, format, and place files on your SD card
4. Wi-Fi internet connection
A Wii wifi internet connection is recommended but not required.
And that is all you need. Pretty basic and simple. Let’s go ahead and get your SD card setup and ready.
Section 2: SD Card Setup
We will now get your SD card setup so your Wii can read it correctly along with placing the SD card files on your SD card. There are two downloads for this process. The PFG Wii U 2026 SD Card Package(SD Card Files) & guiformat (Allows you to format the SD card correctly)
Download 1: Download the PFG Wii 2026 SD card package HERE
Download 2: guiformat
The Wii can only read FAT32 formatted SD cards, which is what guiformat will do for us. Place your SD card into your PC and launch the guiformat program.
On the left side is a list of the drives connected to my PC.(This PC app in windows 11)
On the right is GUIformat.
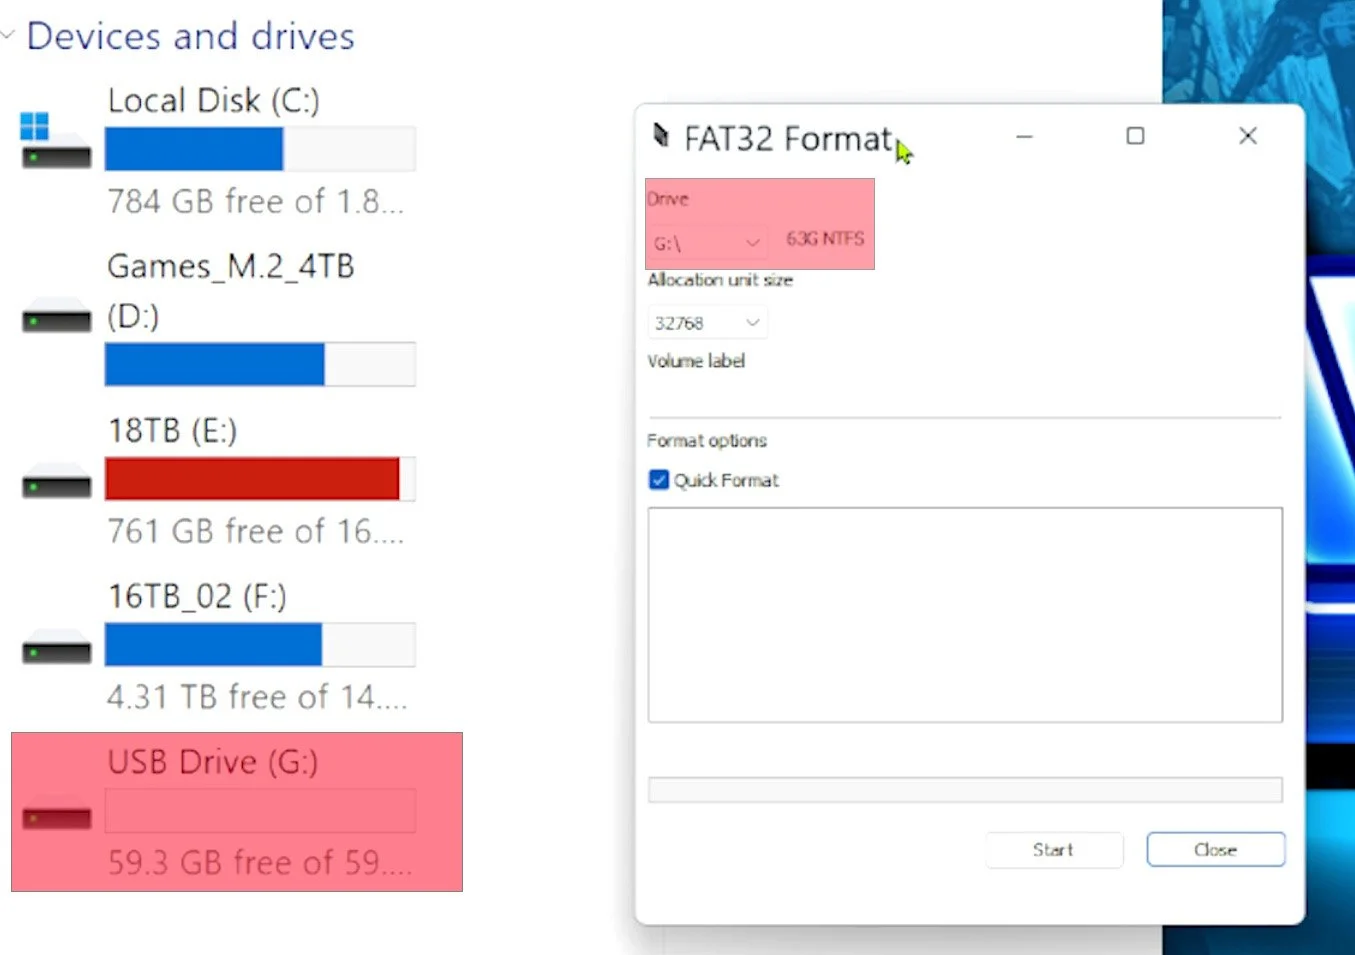
Make absolutely sure you have the SD card that you want to format selected in the drive option in guiformat. This will erase everything on the drive.
For allocation unit size - choose 32768
For volume label - this will be what you name the SD card. Name it whatever you want.
Make sure quick format is checked.
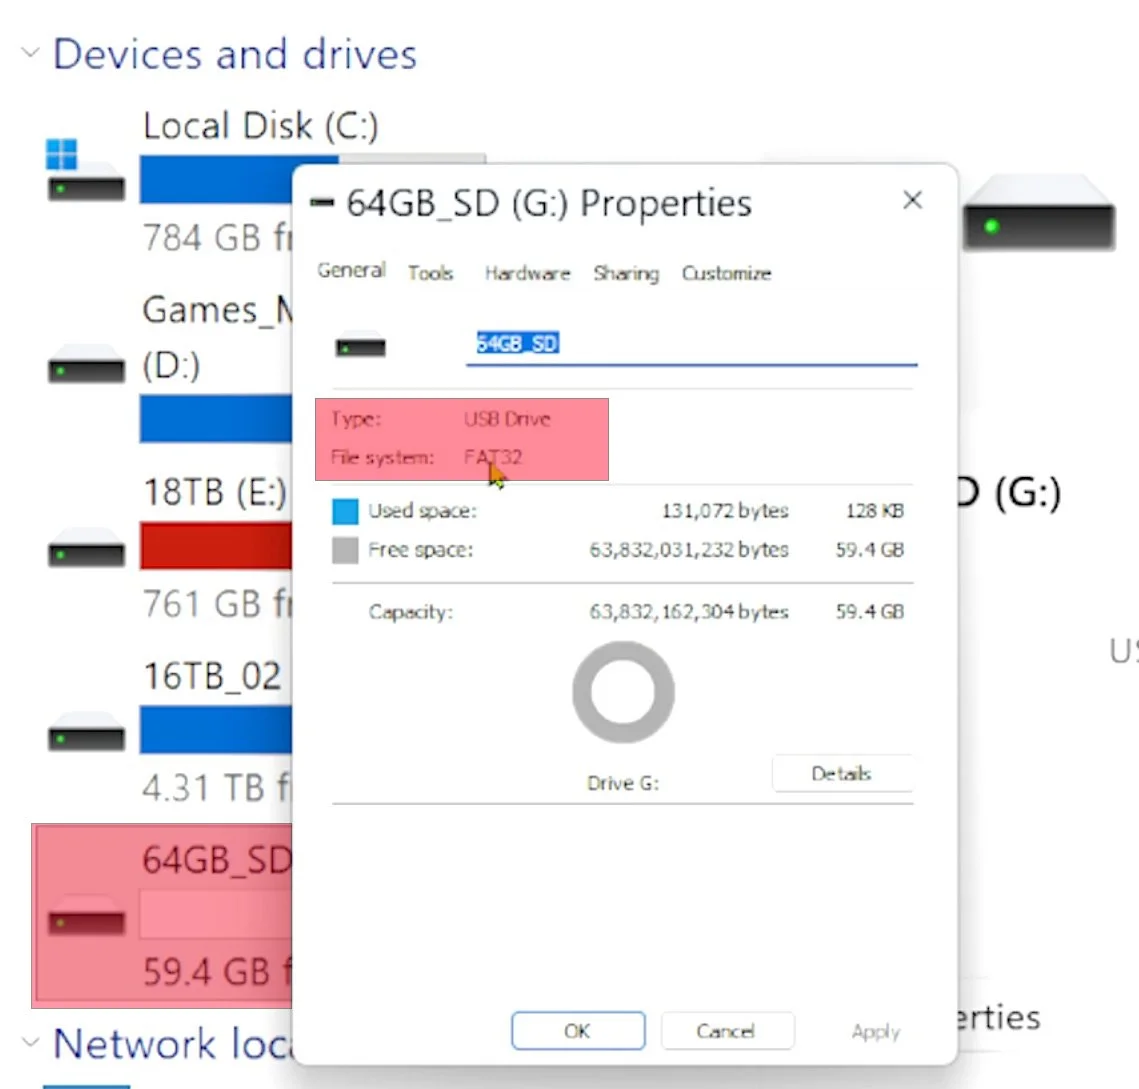
Once those options are ready, close out of ALL windows besides guiformat. You will get a formatting error if all windows aren’t closed. Press the start button in guiformat when ready. This will take only a few seconds to format. Once complete, right click on your drive in “devices and drives” and go to properties. You should now see FAT32
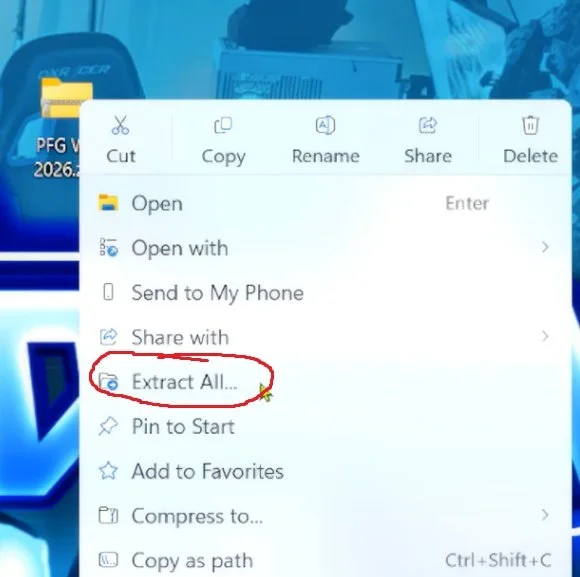
Your SD card is setup and ready for the SD card files transfer. Right click on the PFG Wii 2026 package and press extract all. This will bring you to another option to extract
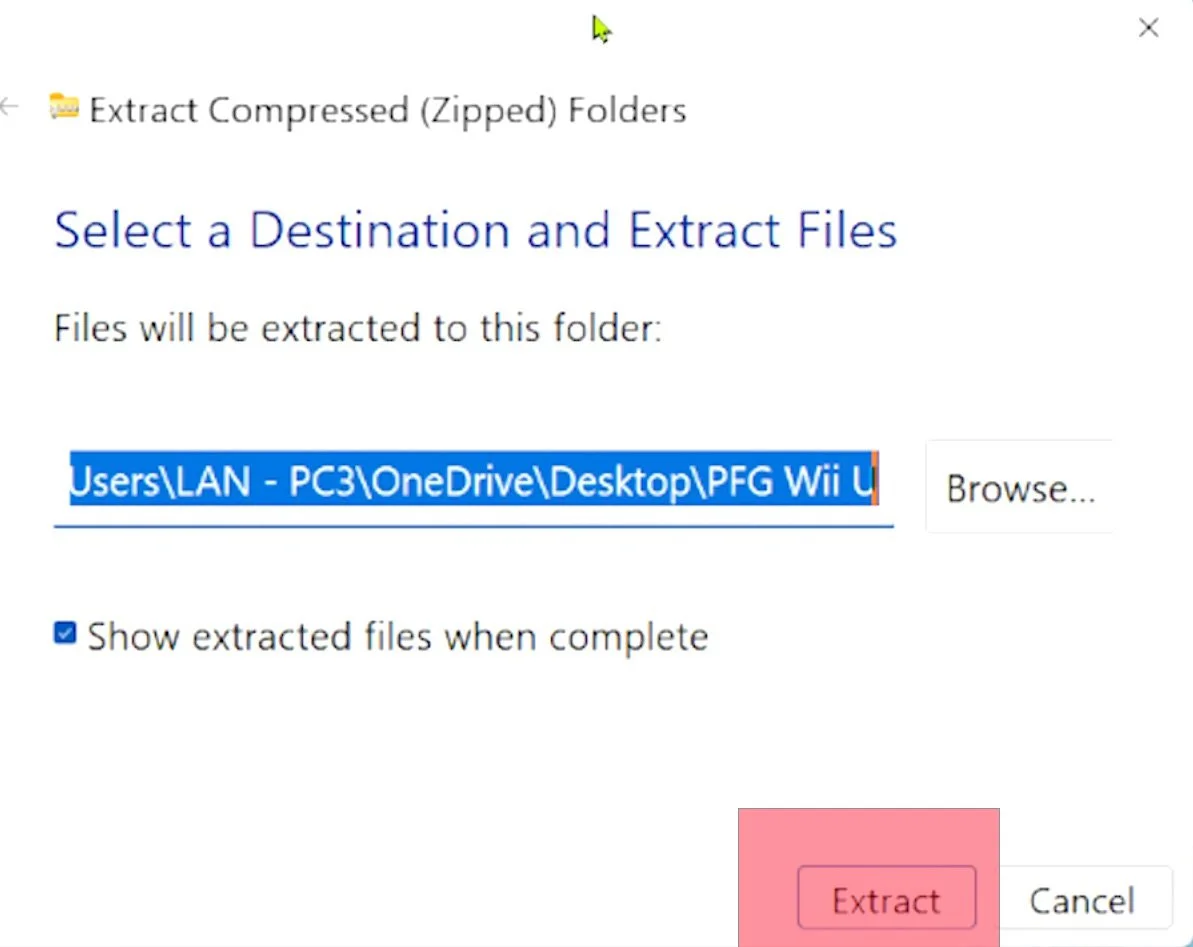
Once the package is extracted, place every folder in the extracted PFG package, onto the root of your SD card. Root meaning inside no others folders. Just highlight all the folders, and drag/drop them onto the root of the SD card.
Your SD card is now ready. Here is a quick overview of the folders and their meaning.
Apps folder - This is where all your homebrew apps are located. Anytime you download apps from the libreshop, this is where they go.
NAND Backup - This is where your NAND files (internal memory) will be backed up to. NAND backups are great to have in case you somehow brick (kill) your console. These files can bring it back from the dead.
WADS folder - WAD files are installable games related to wiiware, wiivc, and forwarders. This folder will hold them to install later.
Section 03: Hacking the Wii
Our main goal in hacking a Wii, is to get the homebrew channel onto the Wii main menu. Once this is done, we have access to all homebrew, which are apps created by homebrew developers that go above and beyond what Nintendo allowed for the console. There are a few different ways to get homebrew channel on the Wii menu, with the easiest being the wilbrand method. I will show this method first, but also have another method in case Wilbrand does not work for you. Let’s begin.
Section 3a: Wilbrand Method
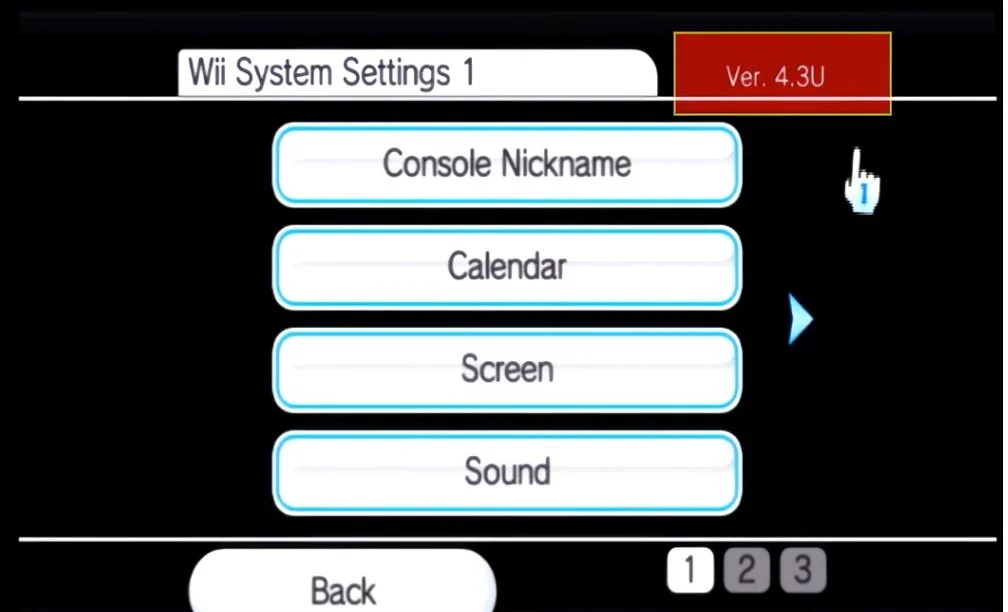
Every Wii has a unique ID, like a serial number. The Wilbrand method uses that ID to make a tiny, custom “key file”. You put that file on the SD card, tell the Wii to look at the file through the Wii message board, and the Wii runs the file long enough to open the door to install the homebrew channel. Once the homebrew channel is installed, your Wii can run unofficial apps or homebrew apps. To start this process, place your Wii SD card into your PC. Turn on your Wii and go to Wii options. Then Wii settings.
Look at the top right to see what firmware version you have. The most up to date firmware, is 4.3. If you don’t see 4.3, it is a good idea to go to the wii system settings and update the firmware.
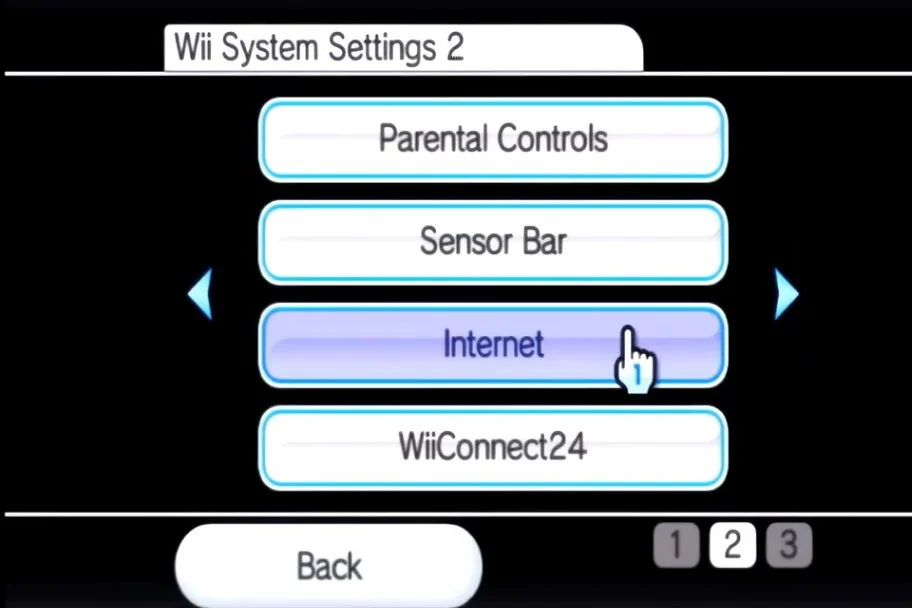
Before you can do that, an internet connection needs to be established by choosing internet and choosing your connection. After your wifi connection is established, it will prompt you to update your firmware. Select yes if below firmware version 4.3.
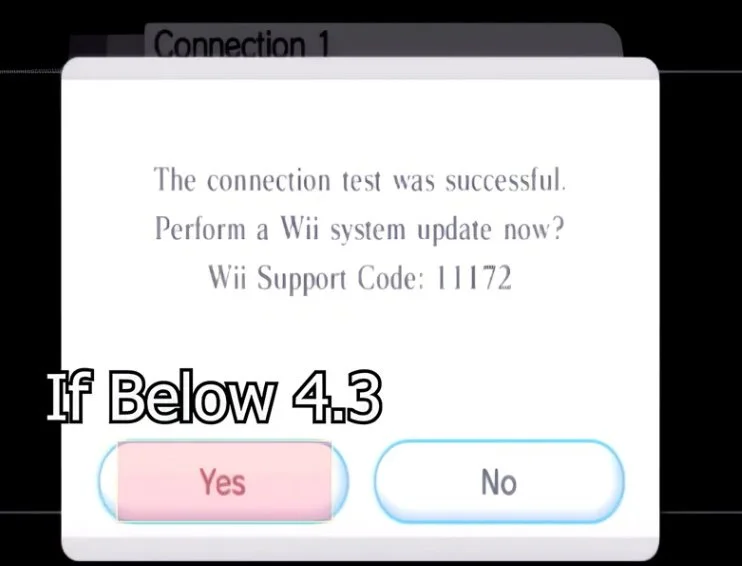
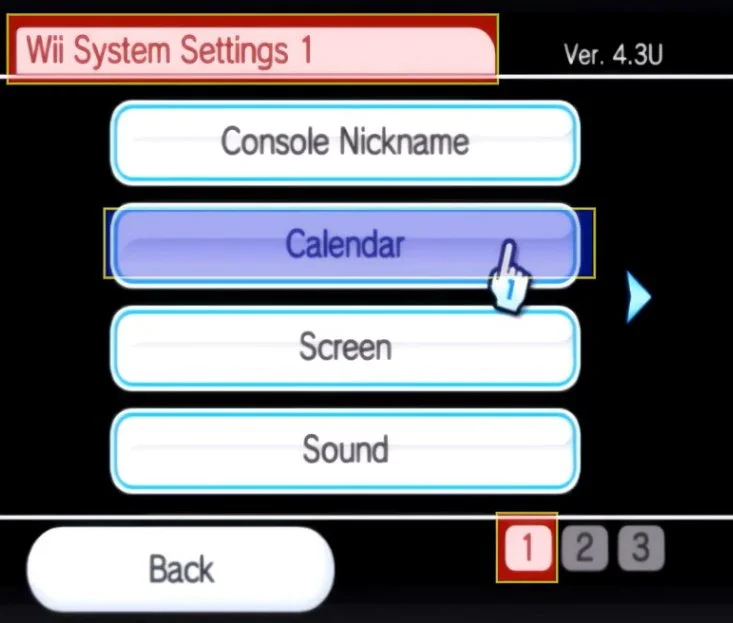
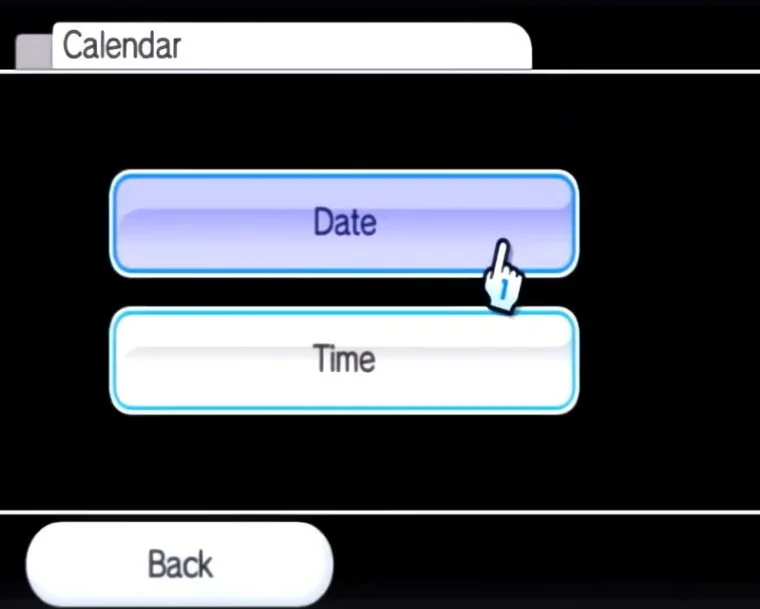
This will update your console to 4.3 If for some reason you can’t get it to update, no big issue as this Wilbrand exploit supports any firmware between 3.0 and 4.3 If your version is 3.0 or greater, you are good to go. Navigate to calendar on the Wii System Settings page 1. Select Date and input your current date. Press confirm. Go to time and input your current time. Press confirm. Inputting the correct date & time is vital in allowing wilbrand to work correctly.
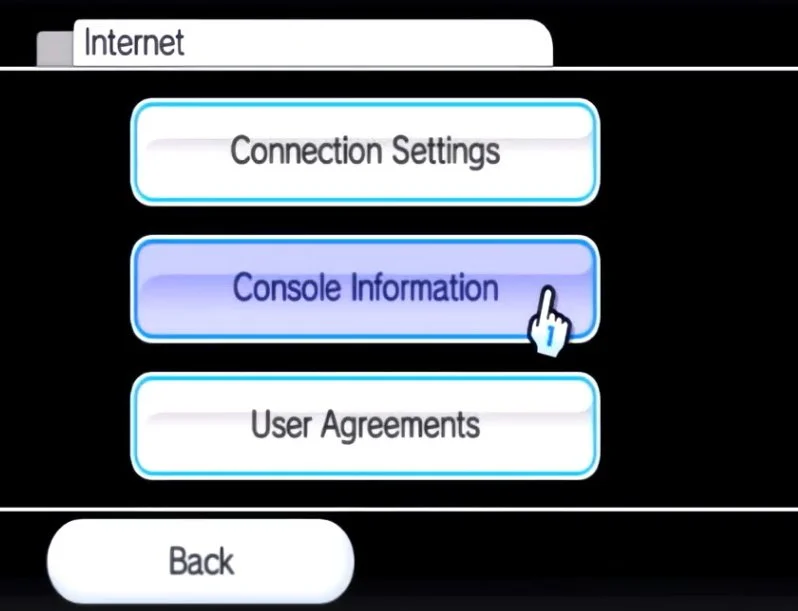
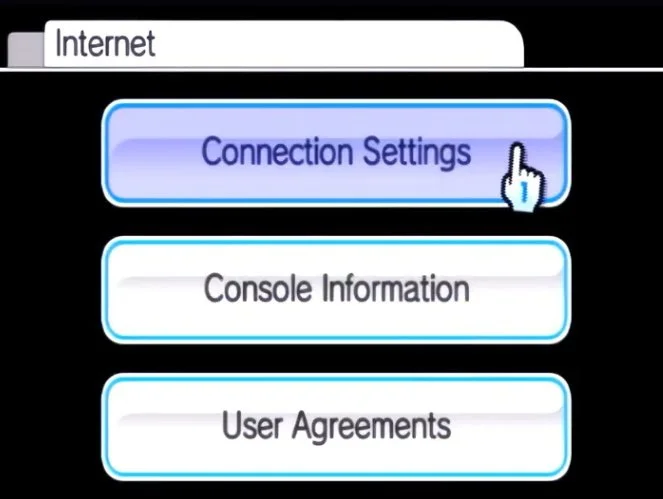
Next, Navigate to internet & Select console information
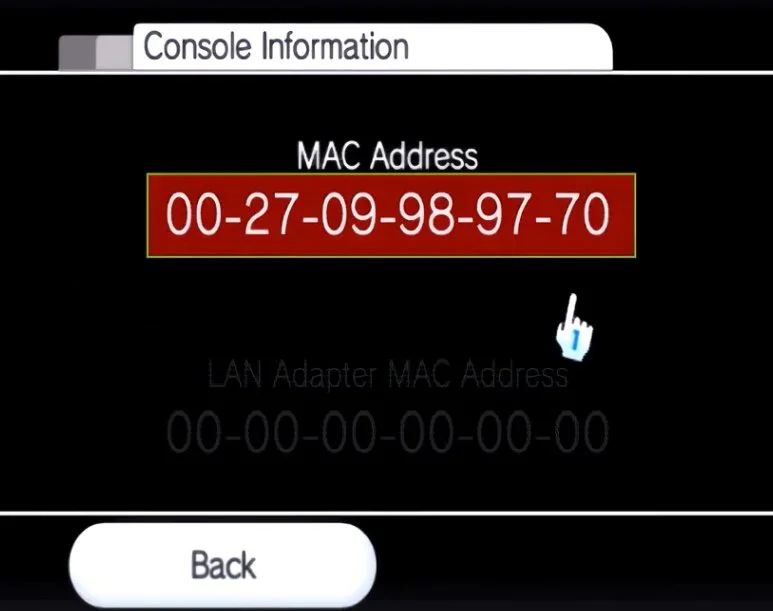
Take note of the full MAC Address by writing it down.
On your computer, navigate to the following website wilbrand.donut.eu.org
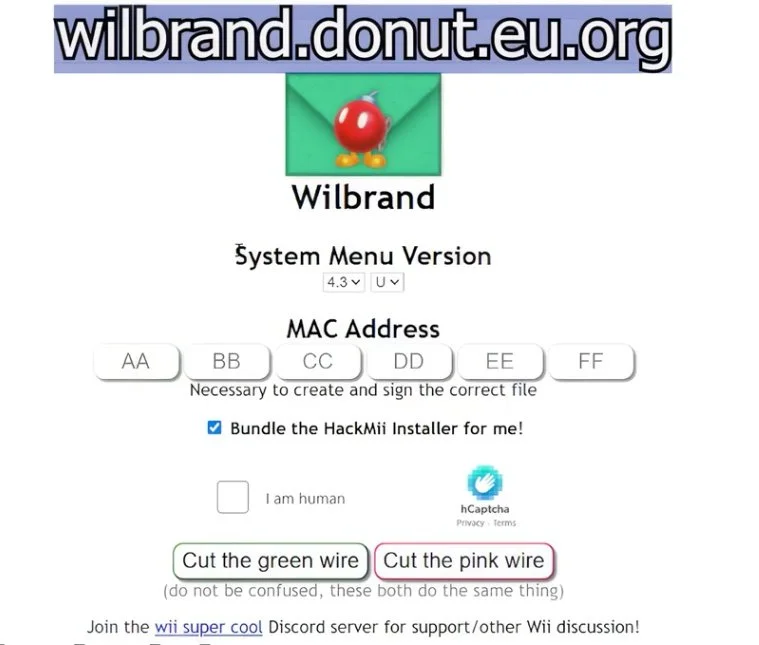
Input your firmware version for system menu version, which was in the top right corner of the wii system settings and should be 4.3 if you just updated. Make sure you put the correct letter which is the region. Next, input your Wii MAC address perfectly. Make sure the “bundle Hackmii installer for me” is checked.
To download the files, Cut either the green or red wire. Both are the exact same.
Click on Download your zip
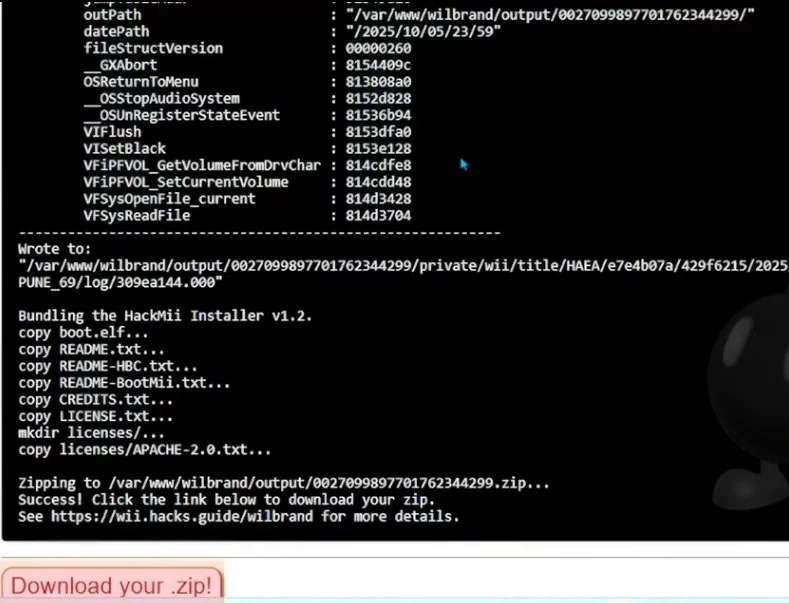
Once downloaded, right click on the archive and Extract.
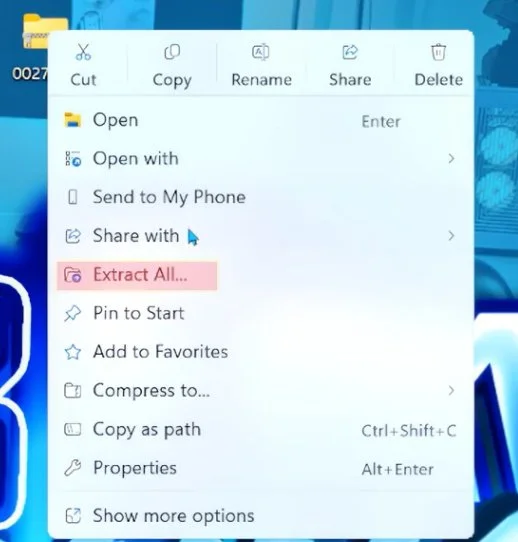
Once downloaded, right click on the archive and Extract.. Once extracted. Transfer the private folder, and boot.elf file to the root of your SD card. Root meaning, not inside any folders.
Once files are transferred, place your SD card back in your Wii and turn it on.
On your Wii, Open the Wii message board in the bottom right corner.
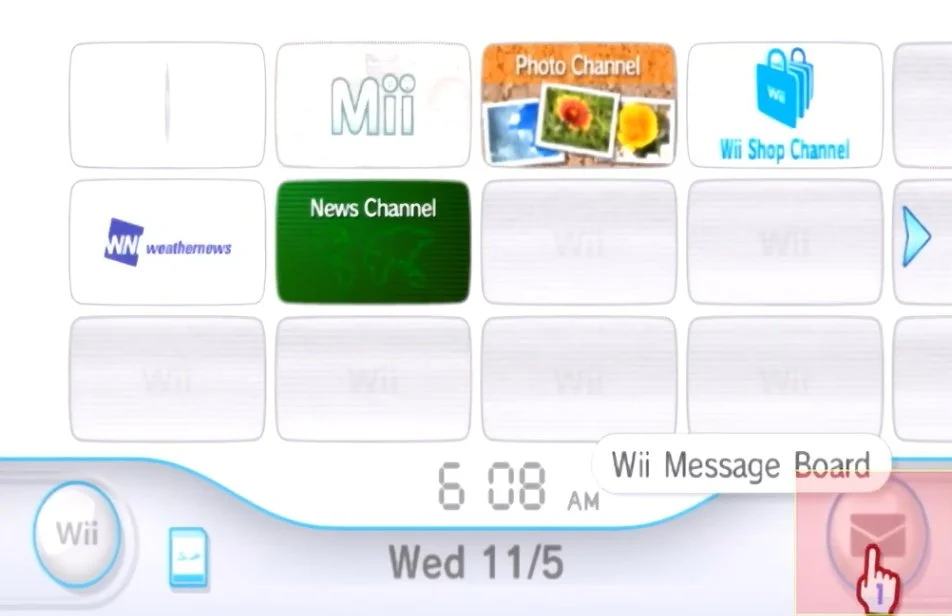
Open the green letter with a bomb. If the green letter does not show up for you, move the left and right arrows as it can possibly be on another page. Still doesn’t seem to show up? Restart the Wii and try again.
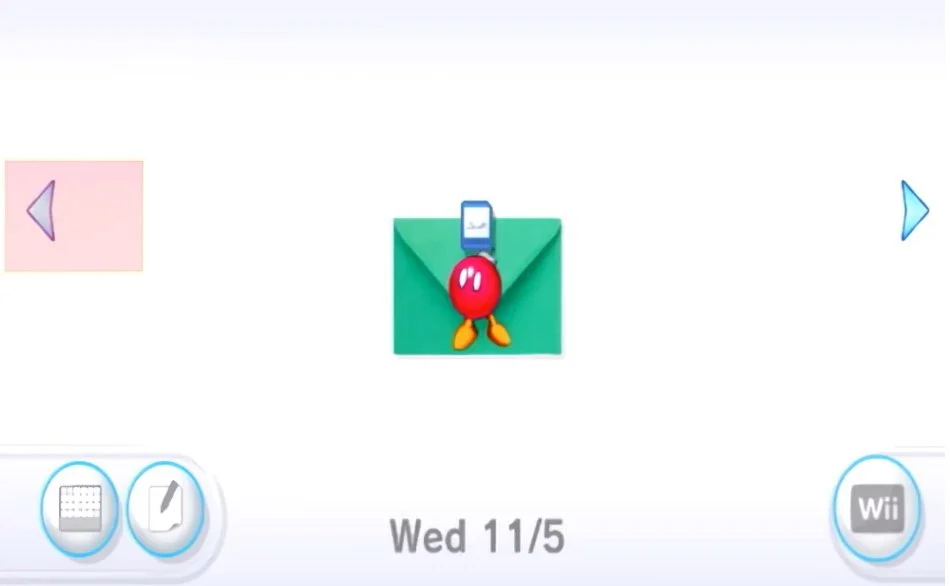
When you open the letter, the hackmii installer will load on screen.
If you get sent back to the Wii menu after opening the letter, ensure the lock switch on the side of your SD card is all the way up in the unlocked position. Still no green letter? Triple check your date and time are correct. Now that you are at the hackmii installer after opening the letter, you are ready to hack your console.
For the people that can’t seem to get to this point, you can try another method next. For all people at the hackmii installer now, go to section 4: Hackmii and Bootmii Installer.
Section 3b: Str2hax
If the bomb letter won't appear, str2hax uses a DNS trick through the Wii's User Agreement screen—no SD files needed for the exploit itself, but keep the card in for later steps.
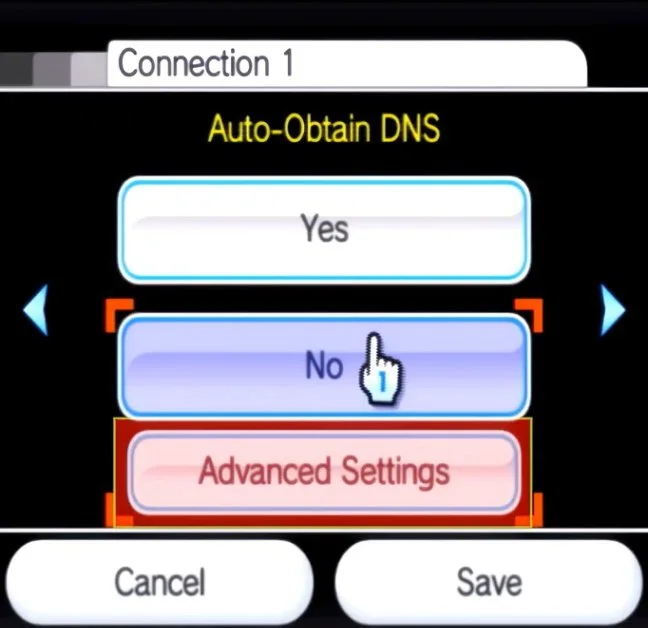
In the Wii Settings go to Internet and then Connection Settings. Select your current wired or wifi connection and select change settings
Press the right arrow 3 times until you get to Auto Obtain DNS and select No
Select Advanced Settings.
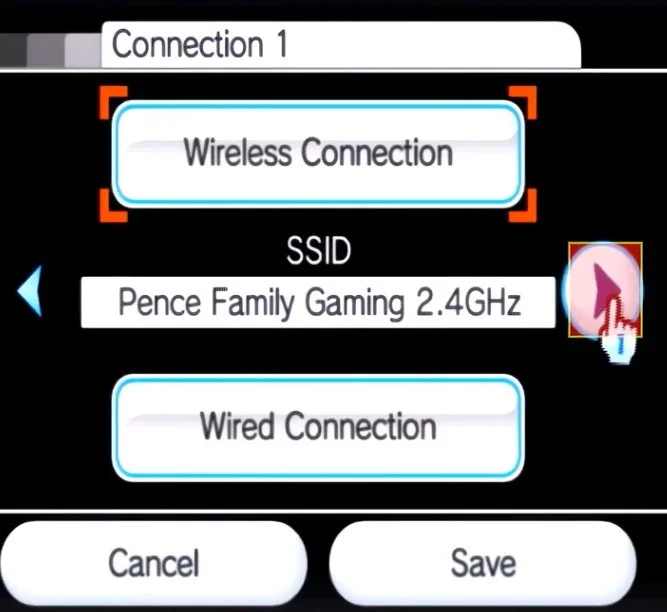
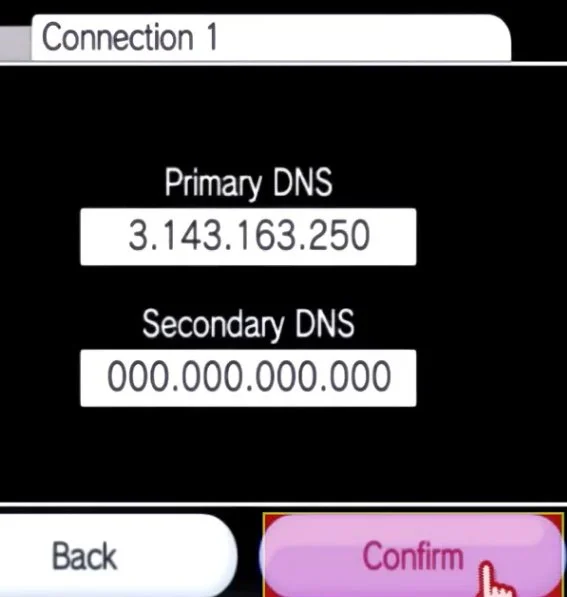
Enter the Primary DNS as 3.143.163.250 exactly.
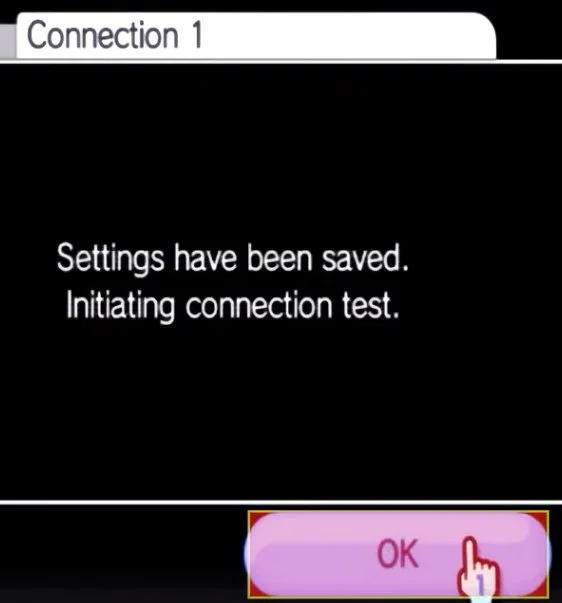
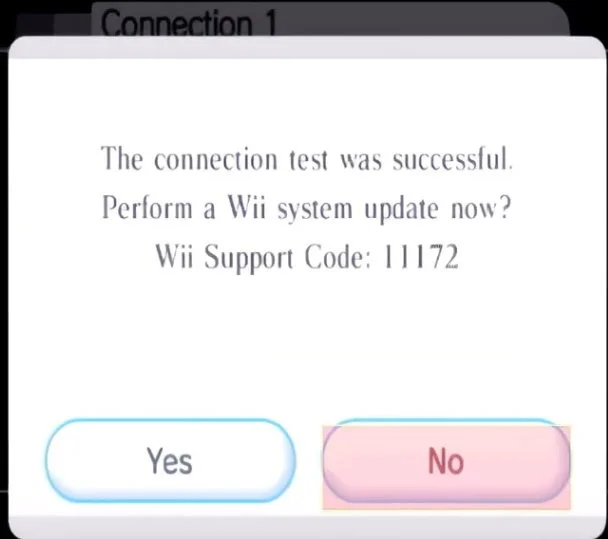
Select Confirm, save, and run the connection test—skip any system update prompt if it succeeds since we already did that.
If it errors, recheck the DNS number.
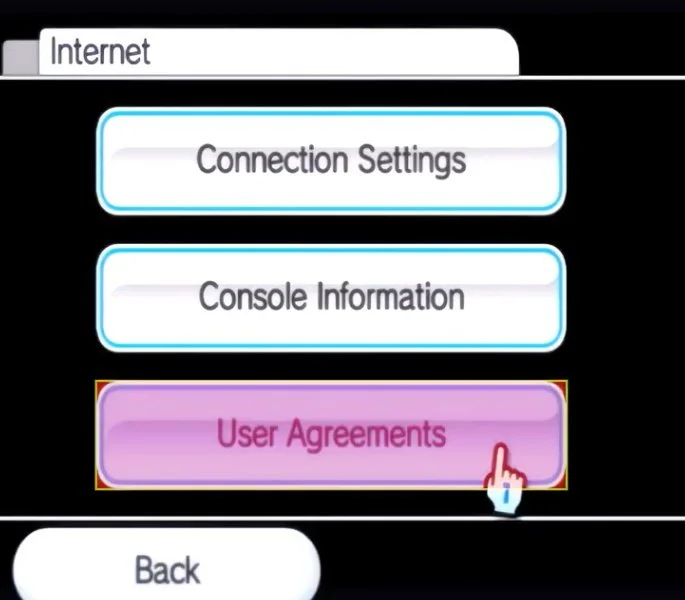
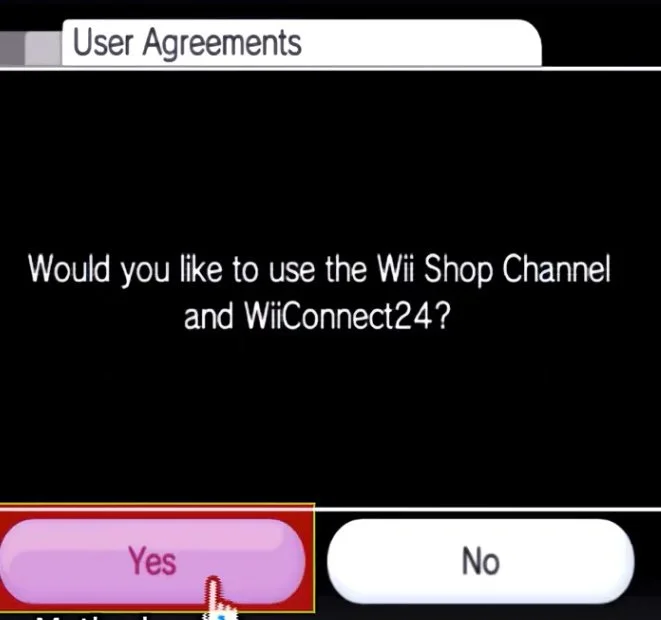
Now go to Internet and select User Agreements.
Would you like to use the wii shop channel?
Hit Yes
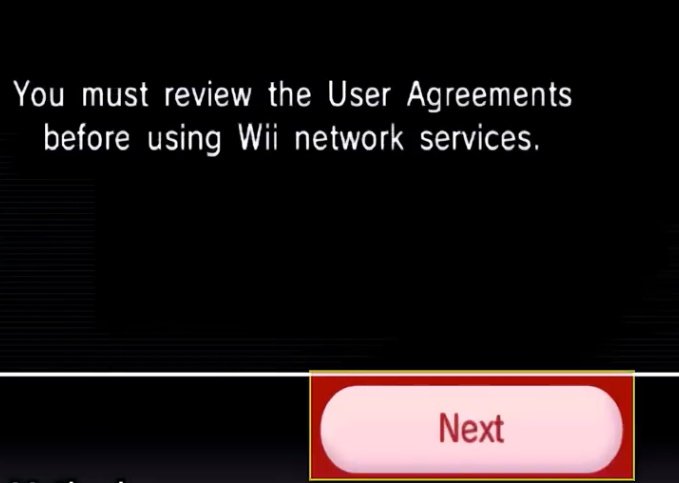
You must review the user agreements
Select Next
You should see this screen. Do not hit “I accept” or “I do not accept.”
We are just going to leave this screen alone for a few minutes while it does the work.
If you just see the normal agreement instead, your ISP might block custom DNS. You can try a mobile hotspot from your phone or a different Wi-Fi to get it to work.
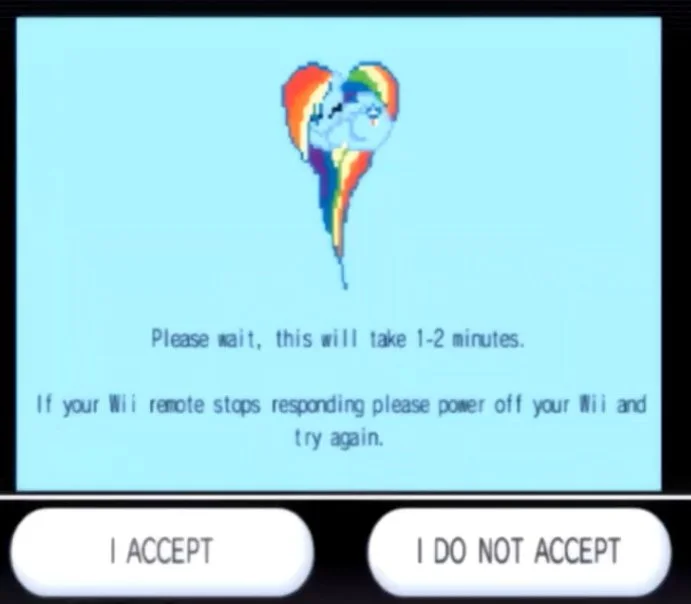
After a few minutes of waiting, it should automaticallyload the hackmii installer and you are ready to proceed.

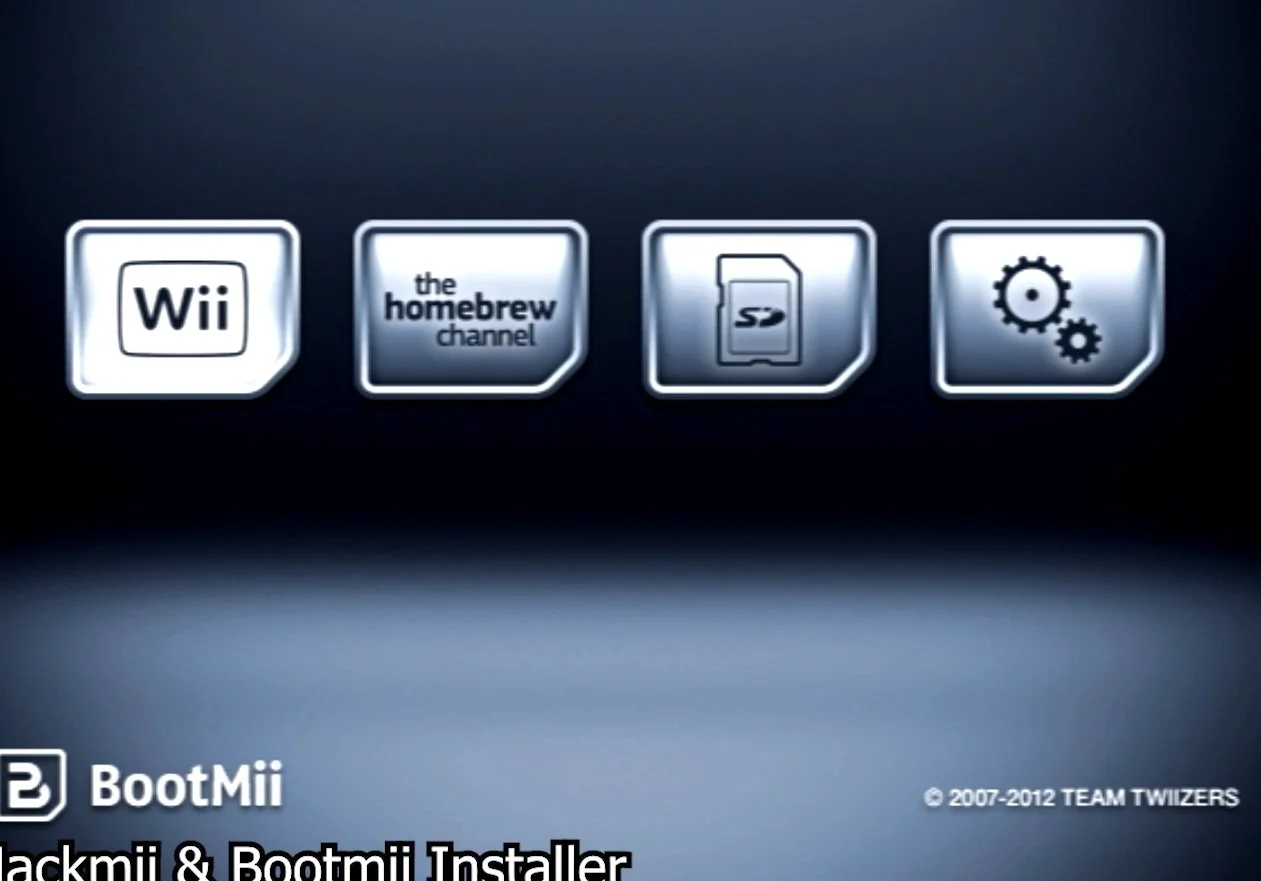
Section 04: Hackmii & Bootmii Installer
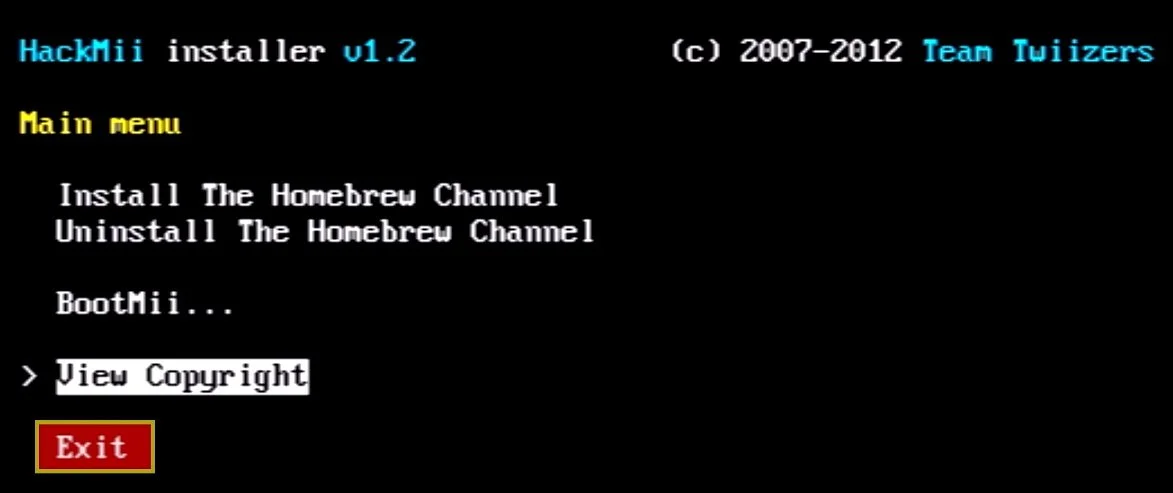
Great, you made it to the hackmii installer page. This section will allow you to install homebrew channel, which is our main goal. It will also allow you to install bootmii, which is a critical piece of software for brick protection, or protection from the console becoming permanently unusable. Once at the hackmii installer page, wait 30 seconds for the “press 1 to continue” prompt to appear and press 1.
Press continue.
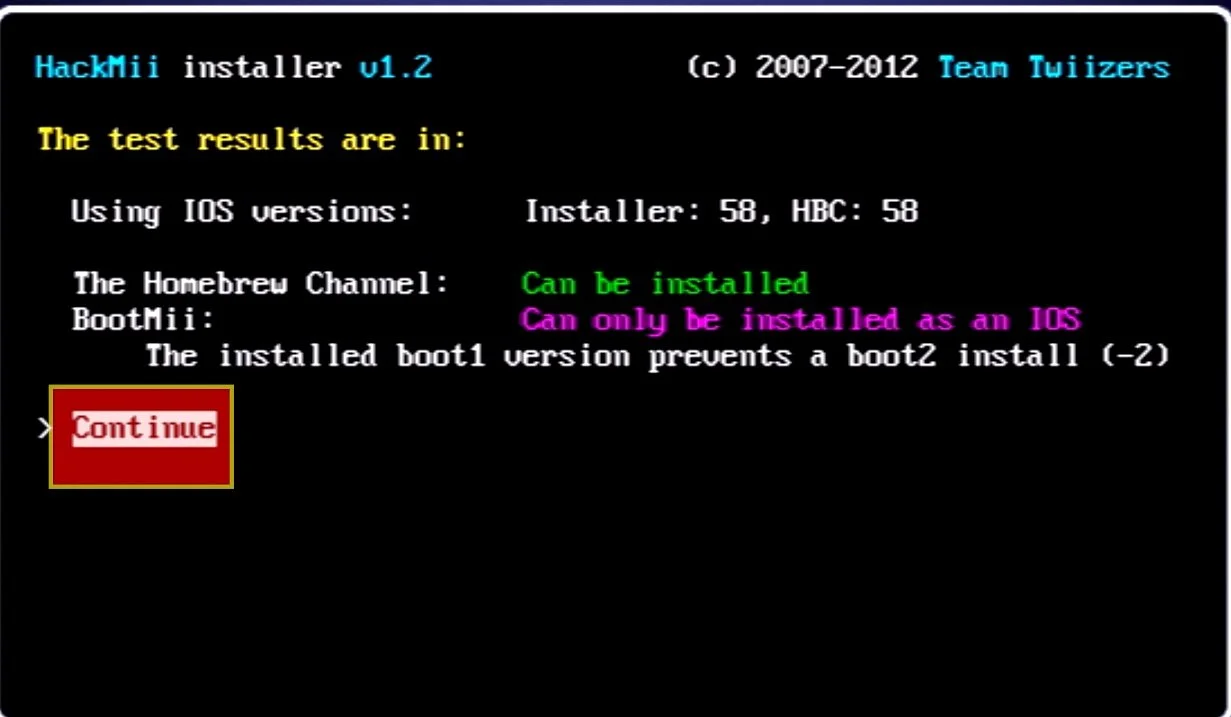
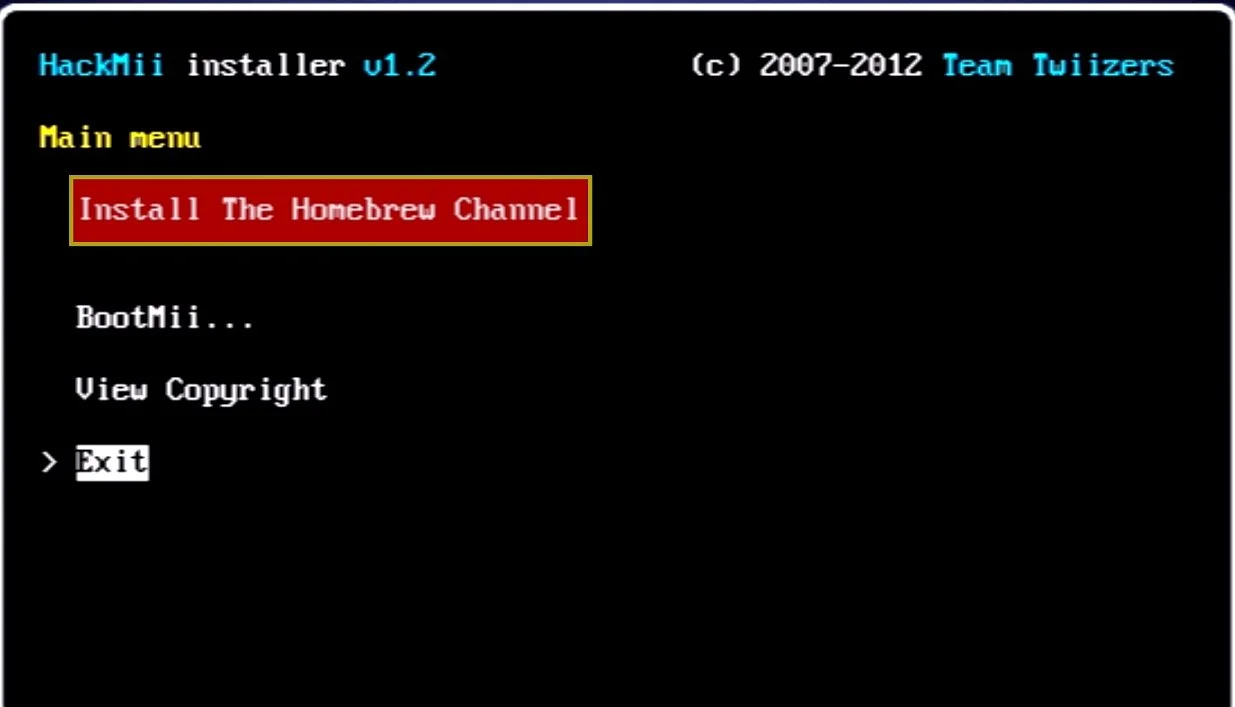
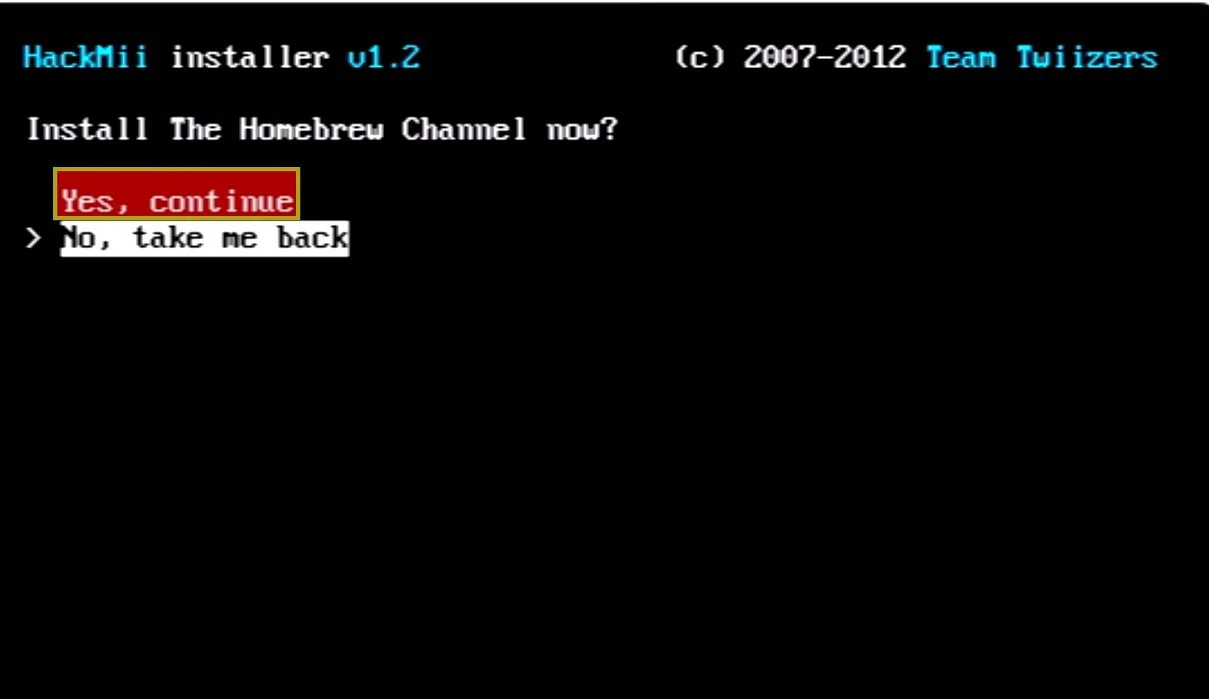
Select “install the homebrew channel” and “yes, continue”
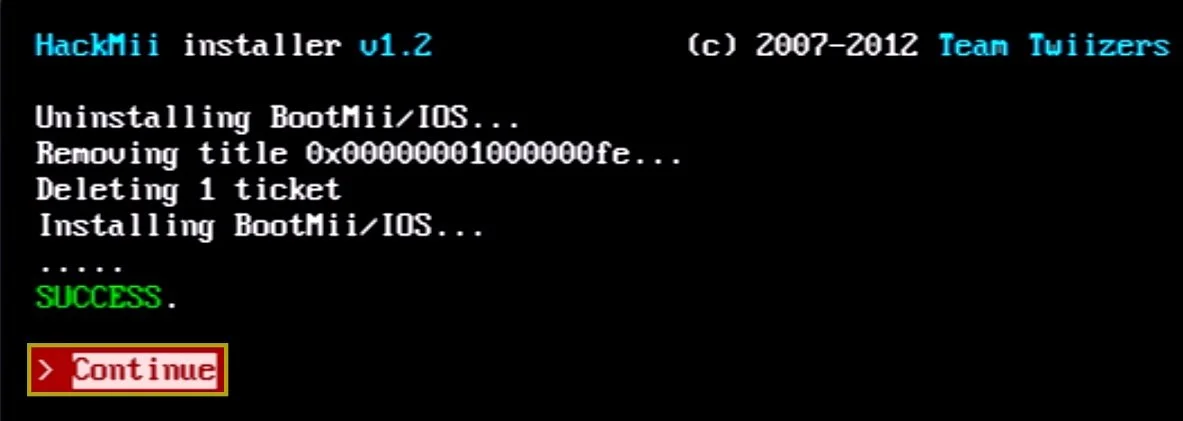
Success - Press Continue

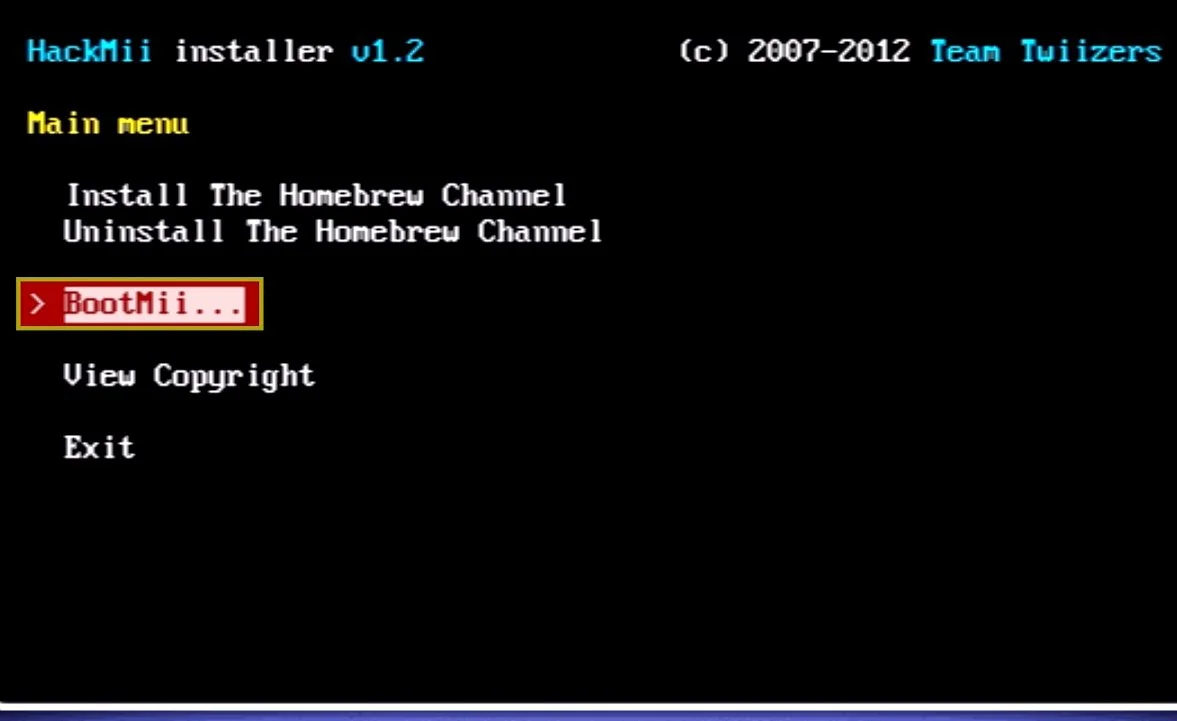
Select bootmii.
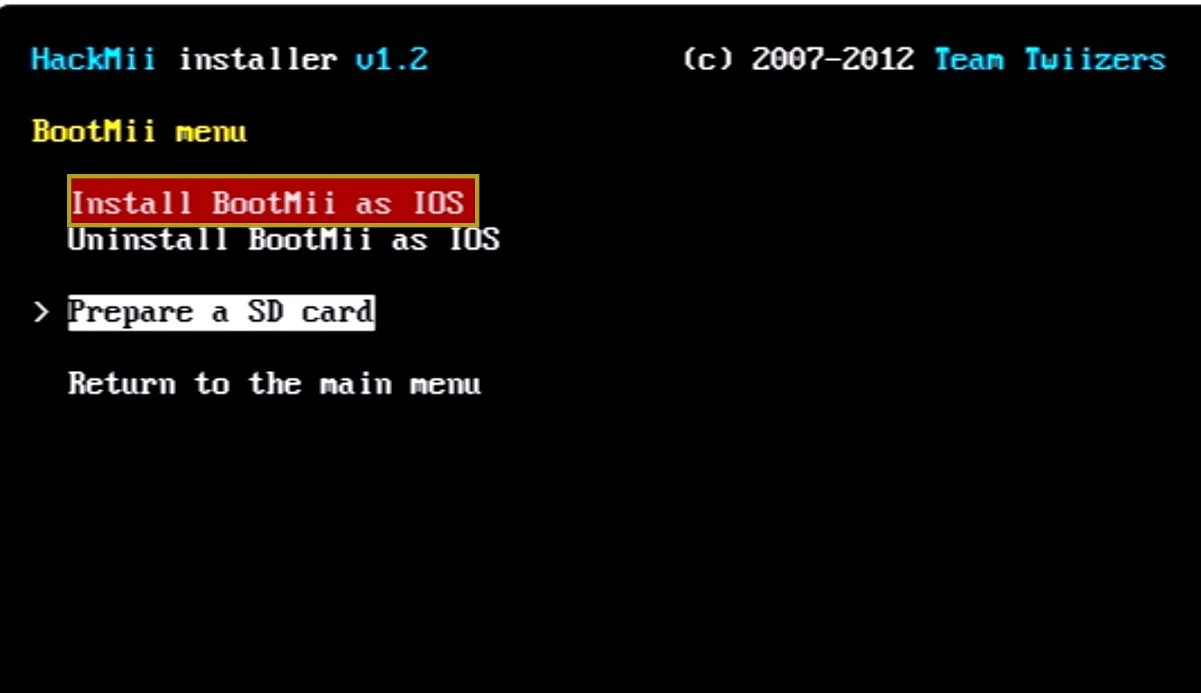
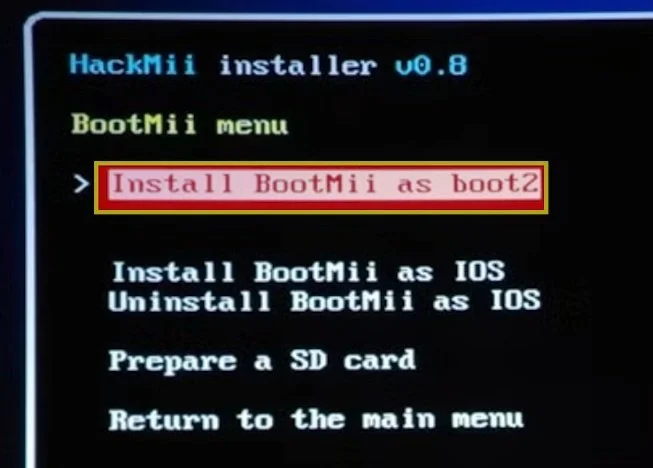
Select install bootmii as IOS
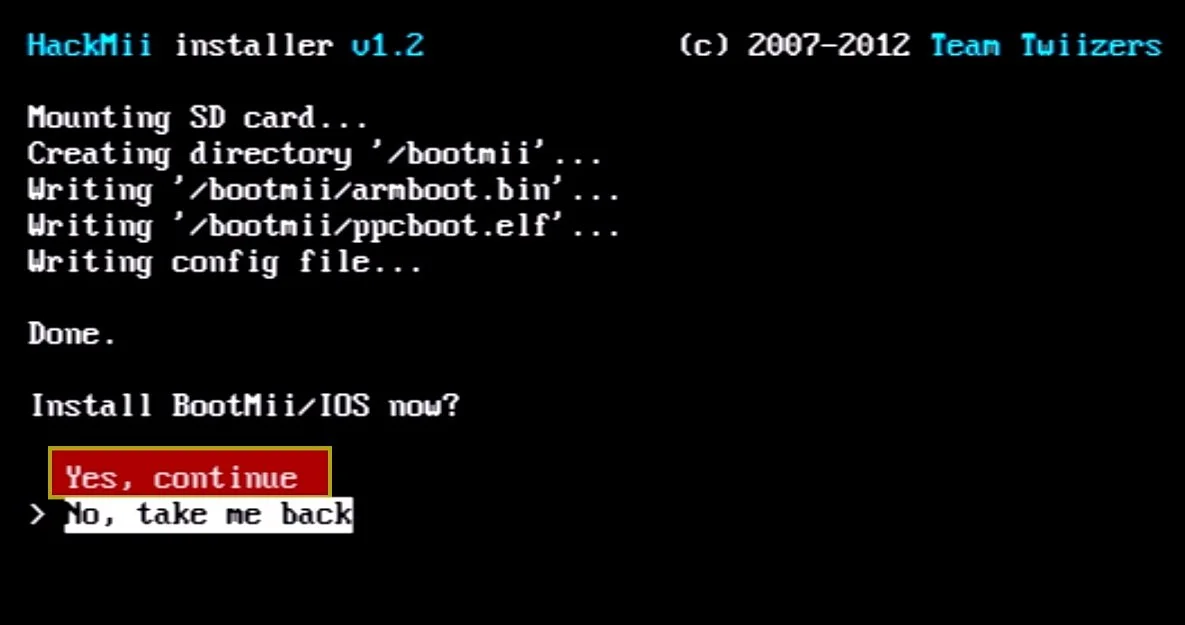
Make sure your SD card is in your Wii. This will allow us to create and restore full backups of our Wii’s NAND memory which will be stored to the SD card and can help recover any issues you have going forward. Install Bootmii/IOS Now? Select Yes continue.
Once it says success, select continue
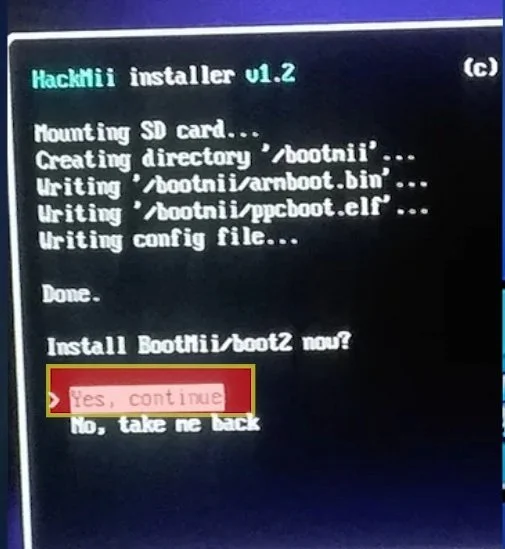
If you get the option to install bootmii as boot2, do that as well as it is an extra layer of protection. Not every Wii will have this option as my Wii isn’t given the option. Only early launch models of the Wii from around 2006 to 2008 will allow the boot2 option as it got patched as later model Wiis were released. Select “Install Bootmii as boot2” if given the option.
Then yes continue.
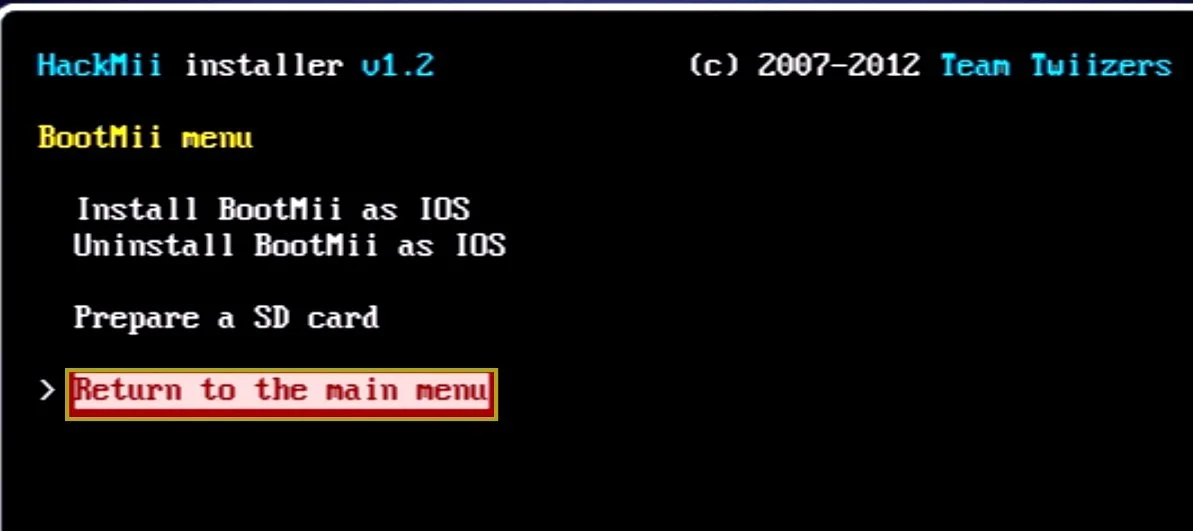
Just take a mental note if you installed bootmii as boot2 as there is an extra step coming up if you did.
Everyone now - Select return to the main menu, then select exit.
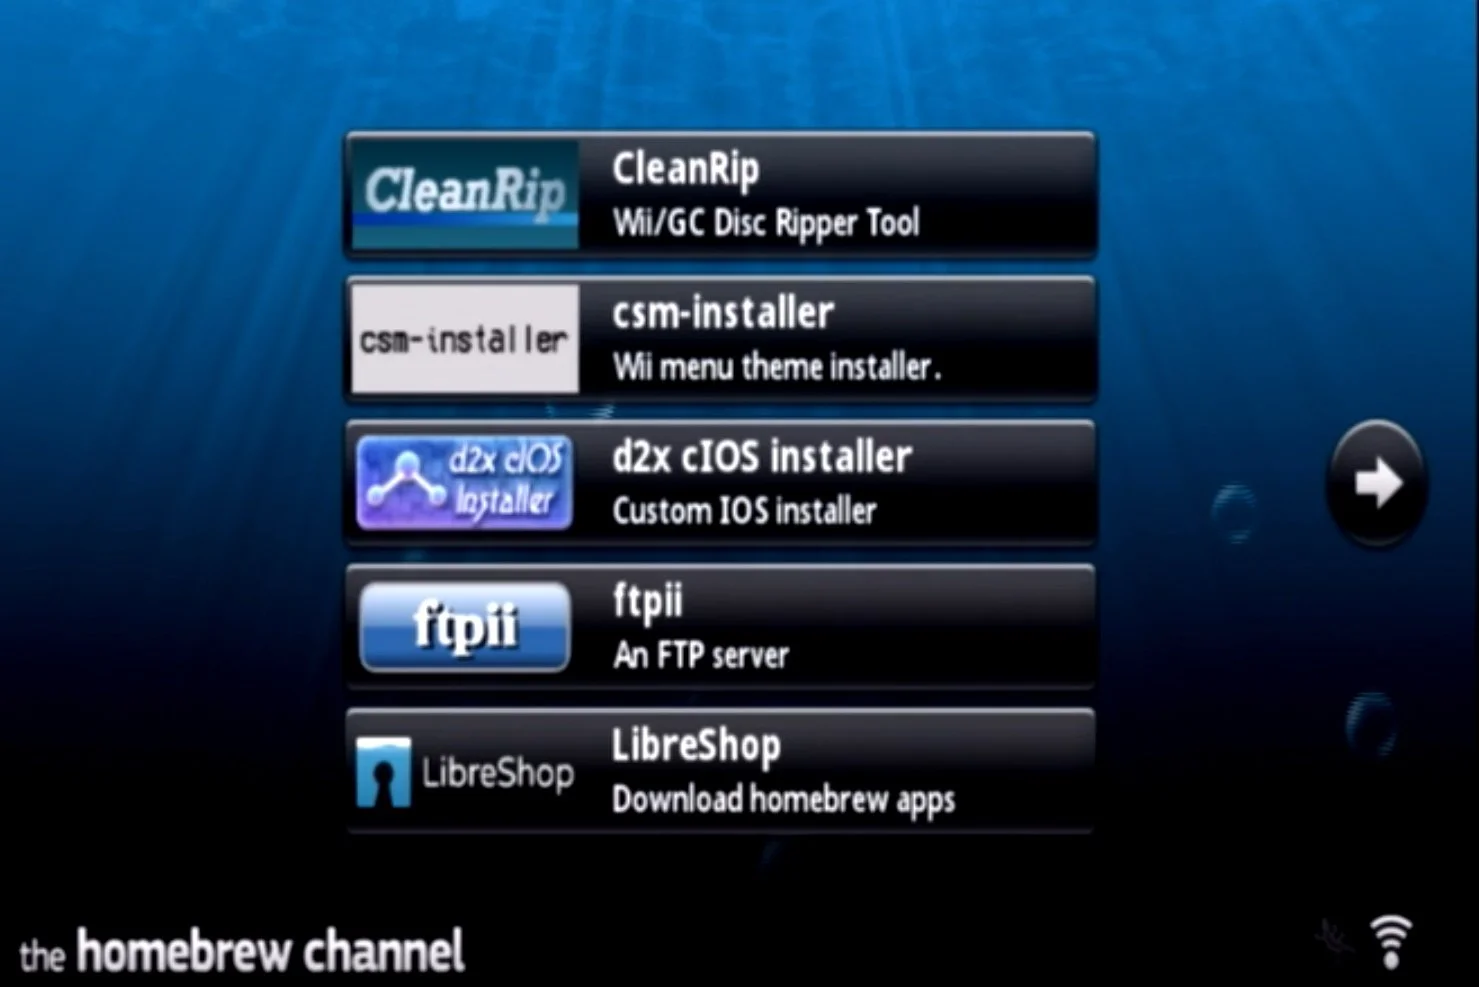
Your console will now load into the homebrew channel, and shows all the homebrew apps located on your SD card in the apps folder.
For the users that installed bootmii as boot2, like I mentioned earlier, if you didn’t load into homebrew channel, you’ll need to restart your console to load directly into bootmii.
For everyone else, to load into bootmii, while in the homebrew channel, press the home button on the Wiimote.
Select Launch bootmii.
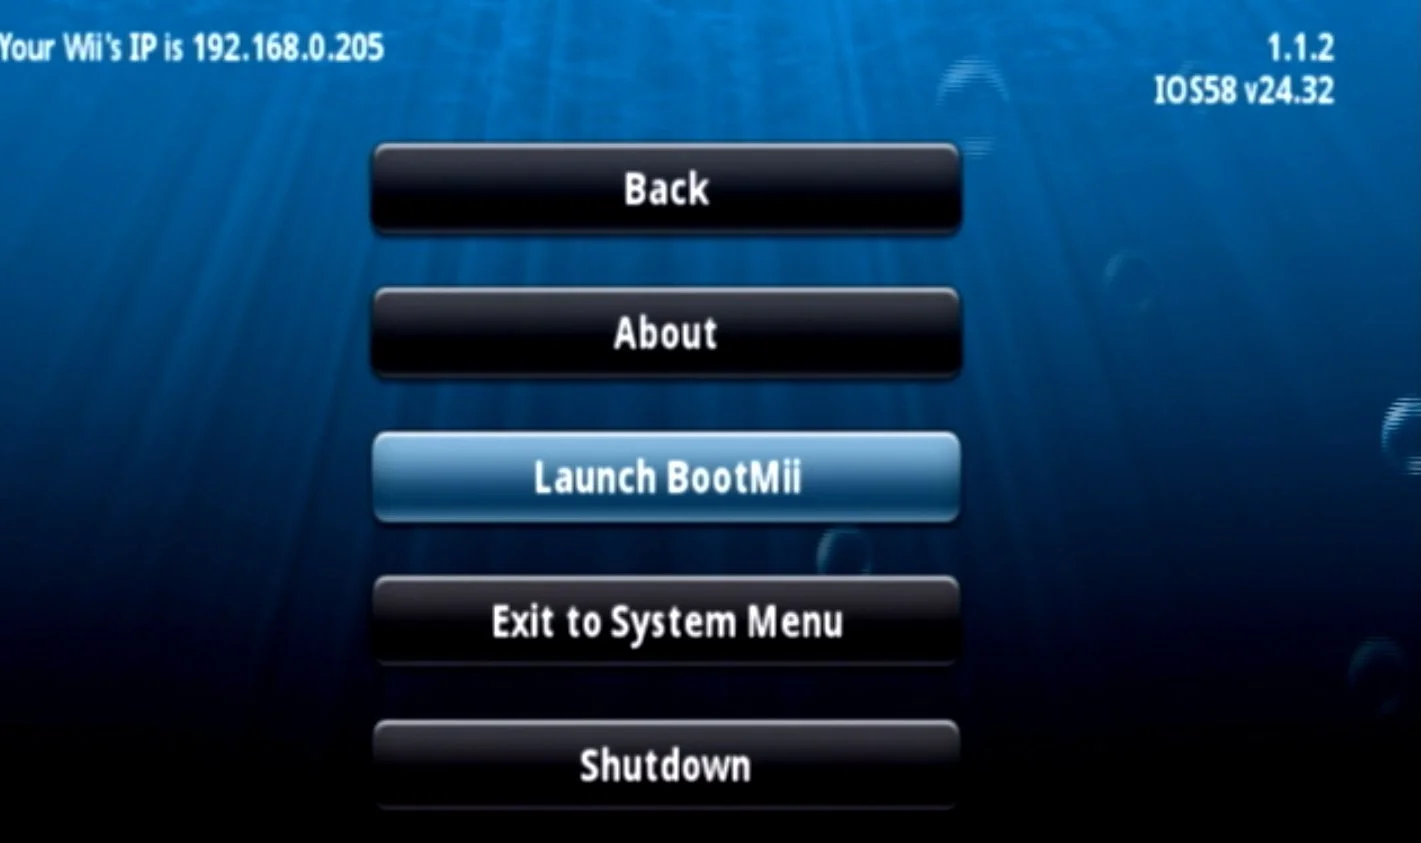
Now that we are in bootmii, let’s protect your Wii as best we can by backing up the Wii’s NAND or internal memory.